
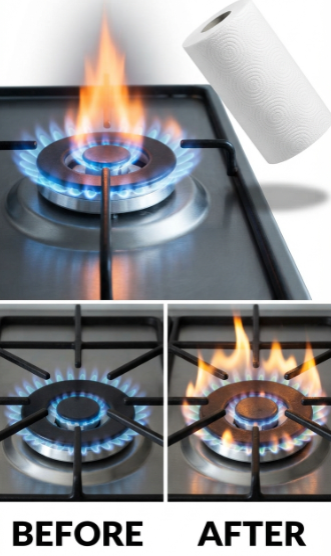
A gas stove is appreciated for its rapid heating, precise temperature control, and ability to produce an immediate flame. Over time, however, grease, food particles, spilled liquids, and carbon deposits can accumulate around the burner caps and flame ports.
When this happens, you may notice that a burner takes longer to ignite, produces an uneven flame, makes a clicking sound, or no longer heats as powerfully as before. In many cases, these problems do not mean that the appliance needs to be replaced. A careful cleaning may be enough to restore normal operation.
Cleaning gas burners regularly can improve flame distribution, reduce ignition problems, and help your cookware heat more evenly. Because the appliance uses gas and an open flame, the work must always be performed cautiously and according to the manufacturer’s instructions.
Signs That Your Gas Burners Need Cleaning
Burner problems often develop gradually. You may not immediately notice that the flame has weakened until cooking begins to take longer than usual.
Common signs of dirty or partially blocked burners include:
- A flame that appears only on one side of the burner
- Uneven or interrupted rings of flame
- Delayed ignition
- Continuous clicking before the burner lights
- A burner that goes out at a low setting
- Yellow or orange flames that persist after the burner has warmed up
- Black marks forming on the bottom of pans
- Reduced heating power
- A flame that looks weaker than the flames on the other burners
A brief orange tint can sometimes be caused by dust, moisture, or substances in the surrounding air. However, a consistently abnormal flame, soot production, or a strong gas smell should not be ignored.
If cleaning does not correct the problem, stop using the affected burner and have the appliance inspected by a qualified gas-appliance technician.
See more on the next page
Why Gas Burner Openings Become Blocked
Everyday cooking produces more residue than many people realize. Oil splashes, sauces, boiling milk, pasta water, sugar, crumbs, and seasoning can reach the burner components.
When the stove is used again, heat may bake these substances onto the metal. Layer after layer can eventually obstruct the small openings through which the flame emerges.
The most frequent causes include:
Grease splatters from frying
Food boiling over
Sauce or milk entering the burner area
Crumbs collecting beneath the burner cap
Cleaning product residue
Moisture remaining after washing
Burner caps being replaced incorrectly
Carbon deposits created by incomplete or uneven combustion
Even a small obstruction can change the way gas moves around the burner. This may create weak areas, larger flames in certain places, or difficulty lighting the burner.
Safety Precautions Before Cleaning
Before touching any part of the cooktop, make sure that every control knob is in the off position and that the appliance is completely cool.
For additional safety:
Extinguish all flames and remove hot cookware.
Turn off the burners.
Allow the cooktop and burner parts to cool fully.
Disconnect the electrical power if your model uses an electric ignition system and the manufacturer recommends doing so.
Close the accessible gas supply valve when appropriate.
Open a window to ventilate the kitchen.
Keep matches, cigarettes, candles, and other ignition sources away from the area.
Consult the appliance manual before removing or cleaning components.
Do not begin cleaning when you can smell gas.
If a gas odor is present, turn off the appliance and gas supply when it is safe to do so, ventilate the area, avoid operating electrical switches, and contact the appropriate gas emergency service or a qualified technician. Official gas-safety guidance advises shutting off the appliance and gas supply when there is concern about a gas appliance.
Materials You May Need
The exact cleaning method depends on the construction of your stove. Check the manufacturer’s manual before selecting a product.
Useful items may include:
Warm water
Mild dishwashing liquid
A soft sponge
A non-abrasive cleaning cloth
An old soft-bristled toothbrush
A dry microfiber cloth
Paper towels
A straight pin, fine needle, or small-gauge wire, but only when approved by the manufacturer
A small bowl or basin for soaking removable parts
White vinegar may help loosen some greasy or mineral residue on suitable removable surfaces. However, it should not automatically be poured into burner openings, gas tubes, injectors, or ignition components.
Avoid using a product simply because it is described as an aluminum cleaner. Some metal cleaners contain strong chemicals that may discolor burner parts, leave combustible residue, or damage protective finishes.
Manufacturers commonly warn against harsh oven cleaners, bleach, rust removers, steel wool, and abrasive cleaning materials on burner components.
Step 1: Remove the Grates and Burner Components
Once the stove is cool and safely switched off, lift away the pan supports or grates.
On many models, the burner cap and burner head or base can also be removed. Take note of where each part belongs. Burner caps are not always interchangeable, even when they look similar.
You may find it helpful to clean one burner at a time. This makes it easier to return every component to its correct position.
Do not force any part that does not lift away easily. Some cooktops have fixed components that are not designed to be removed by the user.
Step 2: Remove Loose Dirt
Use a dry cloth, soft brush, or paper towel to remove crumbs, dry food particles, and loose residue from the cooktop.
Work gently around the igniter. The igniter is often a small ceramic component positioned beside the burner. It can crack if struck or scrubbed aggressively.
Avoid pushing crumbs or liquid into the gas-tube opening beneath the burner.
Step 3: Wash the Removable Burner Caps and Heads
Prepare a bowl of warm water with a small amount of mild dishwashing liquid.
Place only manufacturer-approved removable components in the solution. Allow them to soak long enough for grease and dried food to soften.
Use a soft sponge or toothbrush to clean:
The surface of the burner cap
The underside of the cap
The burner head
Grooves around the burner
Areas where grease has accumulated
The flame ports around the edge
Do not use metal scouring pads or abrasive powders. These may scratch the finish, remove protective coatings, or alter the shape of delicate burner openings.
After cleaning, rinse the removable components thoroughly so that no soap remains.
Step 4: Clear Blocked Flame Ports Carefully
The small openings around the burner head are called flame ports. Gas and air pass through these openings before being ignited.
If one or more ports are blocked, use only the method approved for your particular stove.
Several manufacturers recommend using a straight pin, fine needle, or small-gauge wire to loosen material from clogged burner ports. The tool should be inserted gently and should not be twisted, forced, or used to enlarge the opening.
Do not drill, file, or widen the flame ports. Their dimensions are designed to control gas flow.
Be cautious with wooden toothpicks. Some appliance instructions permit them in specific ignition openings, while other manufacturers explicitly advise against them because the wood can break and remain trapped inside a port. Follow the manual for your exact model rather than applying one method to every stove.
The flame ports around the removable burner head are not necessarily the same as the calibrated gas injector or nozzle inside the appliance. Do not push tools deeply into internal gas components or attempt to alter the injector.
A deeply blocked injector should be serviced by a qualified professional.
See more on the next page
Step 5: Clean the Cooktop Surface
Wipe the surface beneath and around the burners with a soft cloth dampened with warm, soapy water.
For stubborn grease, leave the damp cloth over the mark briefly before wiping it away. This softens residue without aggressive scrubbing.
Keep excess liquid away from:
- Ignition electrodes
- Electrical connections
- Gas-tube openings
- Control knobs
- Seams in the cooktop
- Internal appliance components
Never spray a cleaning solution directly into a burner assembly. Apply the product to the cloth first.
Step 6: Dry Every Component Completely
Drying is essential. Moisture in the burner ports or around the igniter may prevent the stove from lighting correctly.
Use a clean cloth to dry the washed components, then allow them to air-dry completely. Inspect each flame port to confirm that it is clear and free from water, soap, or debris.
Do not reinstall wet burner parts and immediately attempt to ignite the stove.
If a burner clicks but does not light after cleaning, residual moisture may still be present. Turn it off and allow additional drying time.
Step 7: Reassemble the Burners Correctly
Return each burner head and cap to its original position.
The burner head should sit flat, and the cap should be centered and stable. A tilted or incorrectly positioned cap can produce an uneven flame or prevent ignition.
Manufacturers note that correct burner-cap placement is important for effective ignition and steady flame performance.
Replace the grates only after confirming that all burner components are properly seated.
Step 8: Test the Flame
Restore the electrical supply and open the gas valve, where applicable. Test one burner at a time.
The burner should ignite promptly and produce a stable ring of flame. On a properly operating natural-gas appliance, the flame is generally mostly blue.
Observe the flame for several seconds.
Look for:
- Even distribution around the burner
- Stable ignition
- No excessive clicking
- No flames lifting away from the burner
- No soot forming on cookware
- No persistent gas odor
- No unusual noise
A powerful flame is not necessarily the goal. The flame should be controlled, stable, and appropriate for the selected setting.
What Not to Do When Cleaning Gas Burners
Certain cleaning habits can make the problem worse or create a safety risk.
Do not pour cleaner into the gas nozzle
Liquid entering the gas tube or injector may interfere with ignition, trap residue, or damage internal components.
Do not enlarge the burner holes
The ports are manufactured to a specific size. Enlarging them may change the gas-to-air mixture and create unsafe flame behavior.
Do not use excessive force
If a blockage does not come loose with gentle cleaning, professional service is safer than forcing a tool into the component.
Do not mix household chemicals
Combining vinegar with bleach or other chemical cleaners can produce hazardous fumes. Use one suitable product at a time and rinse surfaces thoroughly when required.
Do not use flammable solvents
Alcohol-based products, fuel, paint thinner, and other flammable solvents should never be used around a gas appliance.
Do not reassemble wet components
Moisture can interfere with ignition and create persistent clicking.
Do not ignore a gas smell
Cleaning is not an appropriate solution for a suspected leak. Stop using the appliance and seek qualified assistance.
How Often Should Gas Burners Be Cleaned?
There is no single schedule that suits every household. A stove used several times a day will require more frequent cleaning than one used occasionally.
As a general routine:
- Wipe spills after the cooktop has cooled.
- Remove loose crumbs weekly.
- Inspect the burner ports whenever a spill boils over.
- Perform a more thorough cleaning every one to three months.
- Clean immediately when ignition or flame distribution changes.
Regular light cleaning is preferable to waiting until grease and food become heavily burned onto the components.
How to Prevent Future Blockages
A few simple habits can reduce the amount of residue reaching the burners.
Use appropriately sized cookware and avoid overfilling pots. When boiling pasta, milk, rice, or sauces, reduce the heat before the liquid reaches the top of the pan.
Wipe spills as soon as the appliance has cooled. Fresh residue is much easier to remove than material that has been repeatedly heated.
Also make sure that burner caps are replaced correctly after every cleaning. A misplaced cap can create symptoms that resemble a clogged burner.
See more on the next page
When Cleaning Is Not Enough
Not every weak or uneven flame is caused by dirt.
The problem may also involve:
- A damaged igniter
- A defective ignition switch
- Incorrect burner-cap placement
- A blocked or damaged gas injector
- Improper gas pressure
- A faulty regulator
- Incorrect conversion between natural gas and bottled gas
- A damaged gas hose or connection
- An internal valve problem
- Insufficient ventilation or an incorrect air-to-gas mixture
Contact a qualified gas technician when:
- The burner still does not ignite after cleaning and drying
- The flame remains yellow, irregular, unusually high, or weak
- Soot appears on pans
- The burner makes a popping or roaring sound
- The flame goes out repeatedly
- You smell gas while the controls are off
- The appliance shows visible damage
- You suspect a problem with the regulator, hose, valve, injector, or gas supply
Internal gas components should not be dismantled or adjusted without proper training.
The Benefits of Proper Burner Maintenance
Clean and correctly assembled burners can make everyday cooking more comfortable. Heat is distributed more evenly across cookware, ignition is more reliable, and temperature adjustments become easier to control.
Regular maintenance also reduces the risk of small spills becoming thick, burned-on deposits. It helps preserve the appearance of the cooktop and may prevent avoidable service calls caused by blocked flame ports or misplaced burner caps.
However, cleaning should never be used to conceal a persistent mechanical or gas-supply problem. A burner that continues to behave abnormally after basic maintenance requires professional attention.
Final Advice
To improve the performance of a gas stove, begin with safe, routine maintenance. Turn off the appliance, allow it to cool, wash only removable components, clear approved burner ports gently, dry everything thoroughly, and reinstall each cap in its correct position.
Always follow the instructions supplied with your particular model. Burner designs vary, and a cleaning technique recommended for one appliance may not be appropriate for another.
With careful maintenance, many minor ignition and flame-distribution problems can be corrected. A stable, even flame is not only helpful for faster and more consistent cooking—it is also an important sign that the burner is operating as intended.
See more on the next page
