
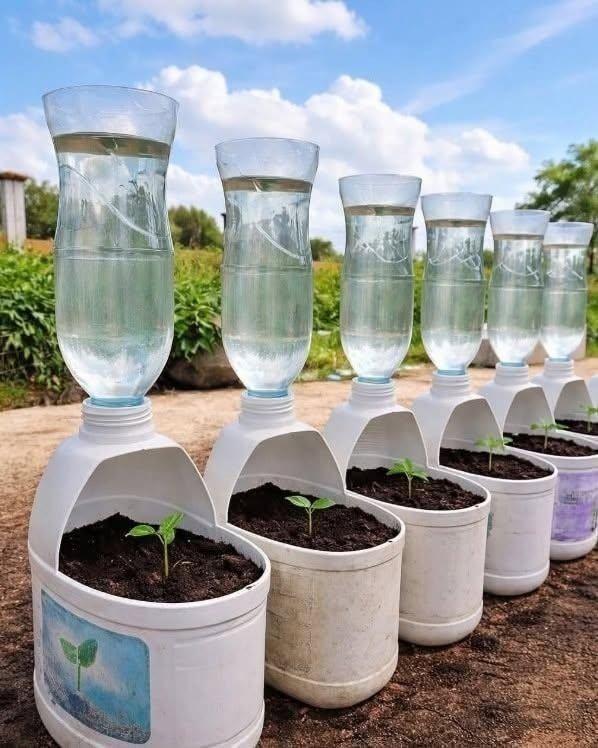
Struggling to keep your plants hydrated during hot summer days? You’re not alone. Whether you’re a seasoned gardener or just starting out, **plant dehydration is one of the most common and frustrating problems**, especially when temperatures soar. Many people water in the morning only to come home to wilted, thirsty plants by afternoon.
But there’s a simple, low-cost solution that can change everything: a **DIY self-watering system** using plastic bottles. 
 This easy method ensures your plants get a slow, steady supply of moisture — even if you forget to water or can’t be home during peak heat. It’s like having a personal plant sitter built right into your garden!
 Why Hot Weather Is So Tough on Plants
In high heat, soil moisture evaporates faster than roots can absorb it — especially in containers, raised beds, or sandy soils. Some common signs of heat stress in plants include:
 Wilting leaves
 Dry, cracked soil
 Yellowing or dropping foliage
 Stunted growth or flower drop
Even daily watering isn’t always enough when the sun is relentless. That’s where **slow-release hydration systems** come in — giving plants a steady trickle of water over time, keeping roots cool and moist without waste.
🛠 What You’ll Need for This DIY Self-Watering Bottle SystemThis project is simple and uses materials you likely already have at home. Here’s what you’ll need:
 Clean plastic bottles (16 oz to 2 liters depending on pot size)
 A nail, pin, or small drill for poking holes
 Scissors (optional if cutting bottle bottoms)
 Your potted or in-ground plants
 Step-by-Step: How to Make a DIY Self-Watering Bottle
Step 1 — Clean and Prepare the Bottle
Rinse your bottle thoroughly to remove any residue. You can use anything from water bottles to large soda bottles depending on your plant size and watering needs.
Step 2 — Poke Small Holes Near the Cap
Use a thumbtack, pin, or heated needle to poke **2–5 small holes** around the cap or neck of the bottle. This controls the flow of water into the soil.
Step 3 — Optional: Cut Off the Bottom
For easier refilling, you can cut off the bottom of the bottle and use it as a mini funnel. Leave the cap on to control water flow.
Step 4 — Bury the Bottle Upside Down
Dig a small hole and **bury the bottle neck-down**, leaving the base exposed for refilling. Make sure it’s securely in place and tilted slightly toward the plant’s roots.
Step 5 — Fill With Water and Let Gravity Do Its Job
Fill the bottle with clean water and watch as it slowly drips into the soil over hours or even days. The drier the soil, the faster it absorbs.
Why This DIY System Works So Well
This homemade method mimics professional drip irrigation — providing:
- Steady moisture at root level
 Water conservation (no runoff or evaporation)
 Less time spent watering
- 🌡 Cooler soil, reducing heat stress
According to horticulture educator Sarah Lin, “Even basic self-watering setups can dramatically improve plant resilience during hot spells. The key is delivering water slowly enough that roots can absorb it without drowning or drying out.”
| Feature | DIY Bottle | Store-Bought Spikes/Globes |
|---|---|---|
 Cost Cost | Free or under $1 | $10–$30 per set |
| 🛠 Installation | Simple DIY tools | Pre-assembled |
| Flow Control | Customizable with hole size | Fixed or adjustable (premium models) |
| Eco-Friendliness | Reuses plastic waste | Varies by material |
 Reusability Reusability | Easy to replace or modify | Reusable, but more costly if broken |
Common Mistakes to Avoid
- Holes too big = fast drainage, poor control
- Bottles not deep enough in soil = unstable or ineffective
- Skipping bottom watering = surface stays wet, roots stay dry
- Using dirty water = clogs holes, harms plants
 Bonus Tips for Better Results
- ✔ Use larger bottles for large containers or thirsty plants (like tomatoes)
- ✔ Add a few drops of organic liquid fertilizer if needed
- ✔ Place mulch around the plant base to reduce evaporation
- ✔ Refill bottles during early morning or evening to reduce heat shock
